TYPO3 Content Management
To print these instructions, right-click within the page and choose Print to open the print dialogue window.
- Before you begin, a note about messing things up
- Introduction
- Logging in
- Selecting your Workspace for editing
- Working with Content Elements
- Working in the Editing Window
- Adding Document and Image files to TYPO3 Workspaces
- Adding PDF files
- Images
- TYPO3 Links
- Deleting Documents/Files/Images from your Filelist
- Format options in the editor
- Previewing Pages
- Moving from Editing to the Next Stage in Workflow
- Reviewing Edited Pages and Publishing
- Getting Help
- Updates to the Faculty and Staff directory listings
Introduction
TYPO3 gives you the ability to keep your area (workspace) of the MCC website up to date, as easily as any other documents you might work with on a regular basis. It also allows for a designated workflow and content approval cycle that minimizes the chance of publishing inaccurate information to the live website. The first part of this editing guide outlines the steps for updating content as a Basic Editor, within an assigned workspace. The Publisher’s role in particular in the TYPO3 workflow is discussed at the end of this page.
Logging in
To begin editing in TYPO3 (as pictured in Figure 1)
- Open www.monroecc.edu/typo3 in the Chrome browser*. Be sure to allow all popups from this site!
- Type your MCC username (your full MCC email address) and password.
- Click the login button.

Figure 1
*Important: Using the Firefox or MS Edge browsers to work within the TYPO3 backend will produce undesirable results.
To begin editing TYPO3 from a computer off-campus, you must first log in to the MCC VPN. The instructions can be found in the Employee tab in MyMCC. Go to:
- Technology
- Remote Work Support
- Off-Campus Access
- Follow the instructions for Remote Desktop Via VPN (AnyConnect).
Selecting your Workspace for editing
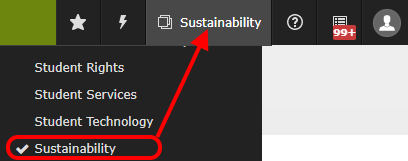
The first time you log in, the page will open to the first workspace you were granted permissions to edit. After your very first login, TYPO3 will remember the last workspace that you were editing in. If you have editing permissions to more than one workspace, you can access them by clicking on the workspace icon in the header bar (as pictured in Figure 2). Note: You should be on PAGE in Module menu (as pictured in Figure 2a).
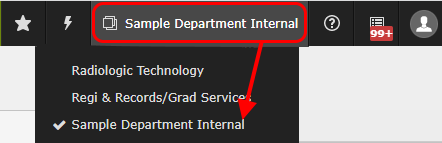
To change to another workspace, click on the desired workspace name. The selected workspace will get the checkmark and the workspace name will appear on the top bar (as pictured in Figure 3).
Working with Content Elements
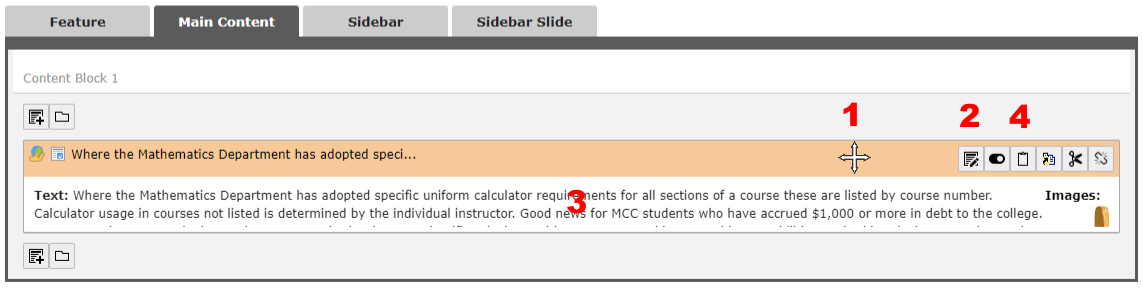
TYPO3 pages consist of one or more Content Elements or Content Blocks. To edit a page, you work within the individual content elements.
Remember: Don’t be confused by all the icons. To find out what an action icon does, use the mouse to point and hover (do not click) over any icon to see the help text appear.
- Pass the cursor over the top bar of a content element until the four-pointed arrow appears
- Click on the pencil icon to open the element for editing.
- Clicking on the text of the element will do the same thing, open the element.
- Clicking on the copy element icon will copy the entire content element and allow you to paste it on the same page or another page (as pictured in Figure 4).
Working in the Editing Window
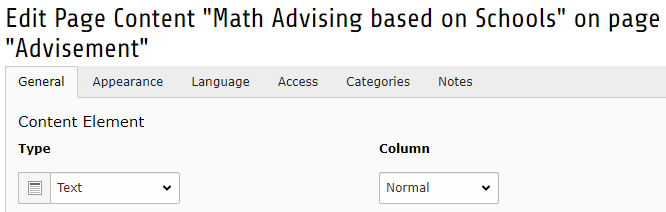
The top of the editing window contains the settings for the content element. For day-to-day editing purposes, you probably won’t be changing the defaults.
There are three main types of content elements that you will use: Text, Text & Images, and Images. Different options for arranging images appear for the Text & Image and Image type of content elements (as pictured in Figure 5).
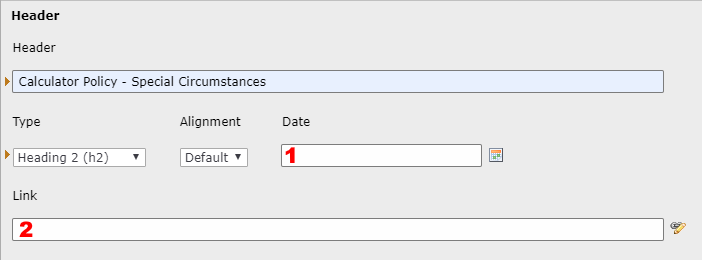
When creating a new content element, the Header can be used as a short title. You can also 1) add a date and 2) make it a hyperlink (as pictured in Figure 6).
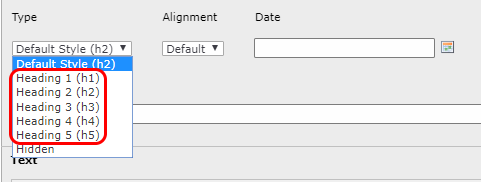
If you give the content element a visible header, remember that in order to follow ADA accessibility rules for content on a page, headings must follow the H1 to H5 protocol. The only H1 on a web page would be the page heading. Content elements below that must cascade down from h2, according to the relationship of one to the next (as pictured in Figure 7).
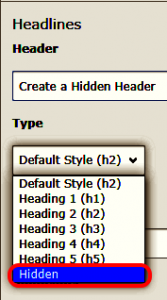
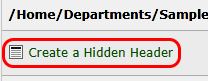
Best Practice: Creating a Hidden Header
Even if you don’t want a visible header in a content element, a hidden header will keep the first column in the Workspaces table from stretching the view to an unmanageable width. If the content element header is left blank, TYPO3 will create a working header from the content element text of up to 255 characters, forcing users to scroll back and forth when working in Workspaces, as pictured in Figure 50 below. A descriptive hidden header of a few words will not be seen in the live page view but will become a working title for the content element.
To create the hidden header, type a brief title in the Header field of the content element, and choose Hidden in the drop-down menu.
The hidden header is now the working title in Workspaces, and subsequently the live title when the element is published.
The toolbar gives you two options for many functions.
You can use (1) drop-down menus or (2) icons (as pictured in Figure 8).

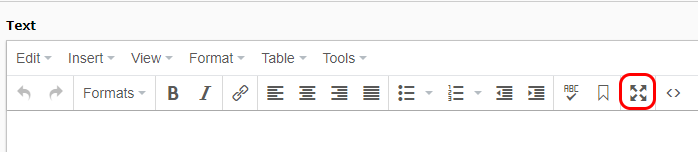
You can use full-screen editing or adjust the screen size for editing using the arrow button in the tool (as pictured in Figure 9).
Editing a content block is similar to editing in Microsoft Word. You will notice that the functional icons in the Rich Text Editor are the same or very similar to Microsoft Word.
Be sparing when using italics, bold and other type features. Try to avoid using terms that someone you met on the street would not be familiar with.
Note: Be sure to use the spell checker once you are done editing ![]() .
.
TYPO3 does not automatically save your changes!
Whenever you make changes to content in TYPO3, be sure to look for the icons at the top of the editing window and click at least one of them (as pictured in Figure 10):
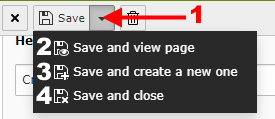
- Save document
- Save document and view page*
You need to use this option when you are done to move this forward in publishing. - Save document and create a new one (content element on the same page)
- Save and close document
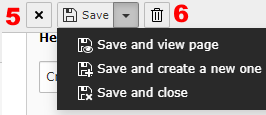
The remaining icon functions are:
- Close document
- Delete (content element)
(as pictured in Figure 11)
Pasting content from MS Word and other sources
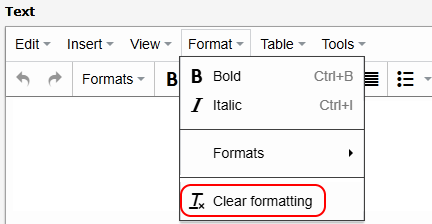
Pasting content from other sources is always a time and effort-saver. However, often extra hidden formatting gets copied into the content element. If you find you need to, you can remove formatting by selecting Clear Formatting from the drop-down menu under Format (as pictured in Figure 12).
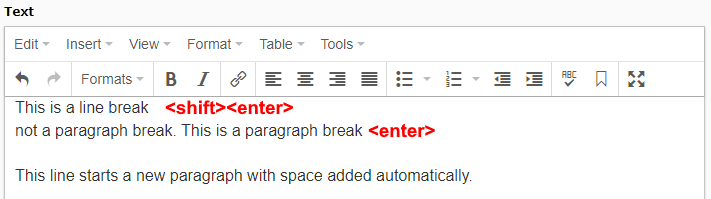
Accessibility Note: Adding white space between paragraphs using double hard or soft carriage returns will decrease the accessibility of the content. The CSS/style sheet is set to provide consistent text line spacing between sentences and paragraphs.
Copy and Paste Functions
While you can copy by selecting Copy in the Edit drop-down menu, or Ctrl+C keyboard shortcut, the Paste option in the Edit drop-down menu will not work. You will need to use Ctrl+V to paste (as pictured in Figure 14).

If by chance you forget, you will get a reminder to use the keyboard shortcut Ctrl+V to paste (as pictured in Figure 15).

Common Content Page
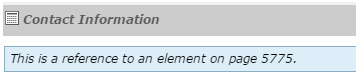
Each department has a ‘common content’ page. This is where the information that appears on multiple pages (such as the contact information found in the right-hand column of department pages) is stored in separate content elements.
These content elements are created on the common content page and then inserted as a “reference.” If you see a blue information bar that states “This is a reference to an element on page….” you should find that content element on your common content page (as pictured in Figure 16).
This allows you to edit the information once and have it displayed correctly on multiple pages.
Adding Document and Image files to TYPO3 Workspaces
TYPO3 editors have the ability to add image files to their workspaces.
Important: Documents must be reviewed by the Web Services Team. Please refer to the Adding PDF Files for information.
Filenames that will be uploaded and referenced on the web should:
- only include letters, numbers, and hyphens
- be all in lowercase
- not include dates or version numbers
- not have spaces within the filename
changing-workspace-fig-3.png, typo3-tips-for-accessibility.pdf
Uploading a file
Before linking to a new document or adding an image file to a content element, it should be uploaded to your TYPO3 workspace in the documents or images filespace. Note: There are options to upload documents in conjunction with linking to the files. It is best to upload your documents/images first to ensure that you are placing them in the proper folders (as pictured in Figure 17).
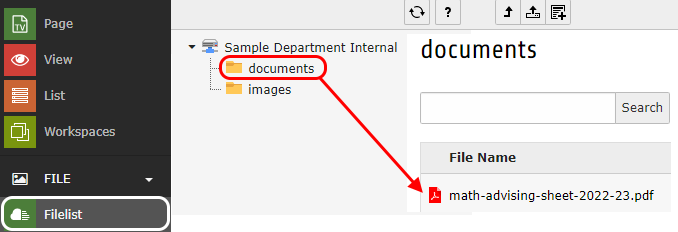
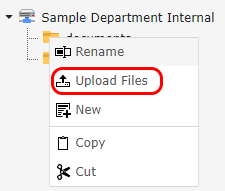
Right-click on the![]() folder icon to the left of documents or images in the page tree area. Click on Upload Files in the fly-out menu (as pictured in Figure 18).
folder icon to the left of documents or images in the page tree area. Click on Upload Files in the fly-out menu (as pictured in Figure 18).
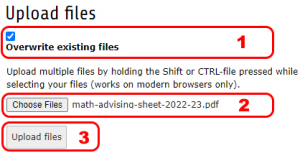
If uploading a new version of a file—
- Select Overwrite existing files.
- Click the Choose Files button and find the file on your own hard drive or any network area where you have access.
- Once the file is chosen, click Upload files.
(as pictured in Figure 19)
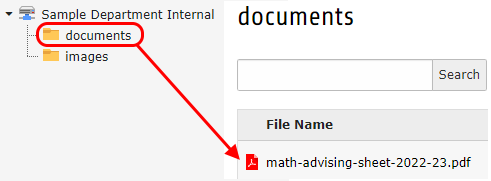
The file name now appears in your workspace file list (as pictured in Figure 20).
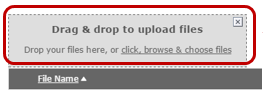
You can also drag and drop files to the space above the Filename bar to upload them.
Once you drag a file to that space, a message will appear (as pictured in Figure 21).
![]() Remember – If uploading a new version of a file— make sure it has the same file name and select Overwrite existing files when prompted.
Remember – If uploading a new version of a file— make sure it has the same file name and select Overwrite existing files when prompted.
Adding PDF Files
If you would like to upload a PDF to your website, it must be reviewed by the Web Services team for accessibility. Please submit the source file and the PDF via a Technology Support Request and allow two weeks for the review and processing of your document(s). When complete, the Web Services Team will upload the file to TYPO3 and add the link to your website.
Please note that some programs do not create accessible documents. View information about Accessible Documents to learn more.
Images
Images should be optimized for Web presentation, including physical and file size, and file format. While TYPO3 has some built-in formatting tools, it is best that you contact the Web Services Team if you are not familiar with these formatting requirements.
Pictures shot with today’s digital cameras are too large a file size to be placed on the web without editing. The Web Services team can assist you with these issues.
Images on the web should have alt attributes so that assistive technology can describe the image and/or function of the image in a meaningful way. See WebAIM’s alt text page for additional guidelines on writing alternative text.
TYPO3 Links
The TYPO3 link icon is used to create links to pages, files, external URLs (other websites), and email addresses. The process is very similar for each type of link.
To begin creating each type of link Select the text that you want to link your file to and click on the TYPO3 Link icon (as pictured in Figure 23).

Accessibility Advice:
- Avoid phrases like “Click here”, “Here”, “More”, “More information”, “Read more”, and “Continue.”
- URLs as link text should usually be avoided unless the URL is relevant content.
Linking to a document
Once you have uploaded a document file, the process of linking to it in the edit page view is quite straightforward. Click on the Page module, and then the item in the page tree that you wish to edit. Open a Content Element for editing. (See Working with Content Elements, in this guide.)
Select the text that you want to link your file to and click on the TYPO3 Link icon (as pictured in Figure 23).
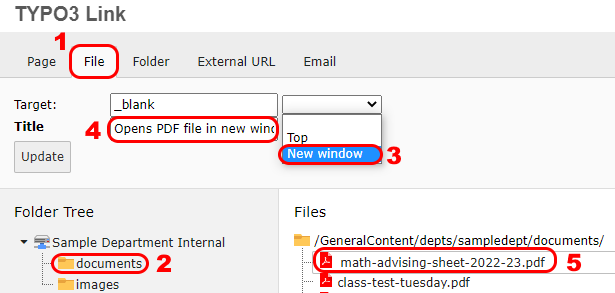
- Click on the File tab.
- Click documents in the Folder Tree.
- Click the down arrow to open the target menu and choose New window (as pictured in Figure26). This will open the document in a new browser window or tab when a user clicks on the link in the Web page.
- Type Opens PDF in new window in the Title field.
- Under Files: Click on the file name to choose that document. Save and switch to preview mode (see Previewing Pages) to test the link.
(as pictured in Figure 25)
Linking to another Page
At times you may want to link to another page on the MCC website, such as directions to the College or another page within your own department.
Once you are editing within a content element, select the text that you want to link your file to and click on the TYPO3 Link icon (as pictured in Figure 23).
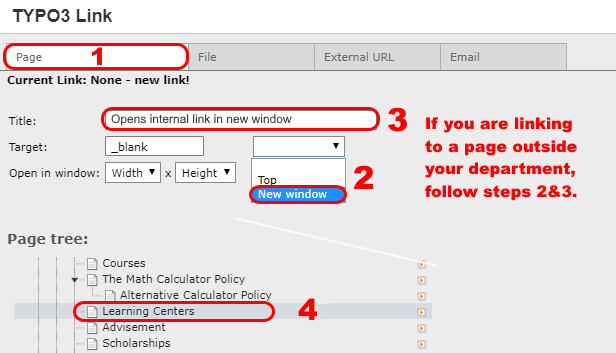
- Click on the Page tab.
- If you are linking to a page outside your own department, click the down arrow to open the target menu and choose New window. This will open the page in a new browser window or tab when a user clicks on the link in the Web page.
- Type Opens internal link in new window in the Title field.
- Browse the page tree to reach the page you wish to link to and click on the page name.
(as pictured in Figure 26)
Save and switch to preview mode (see Previewing Pages) to test the link.
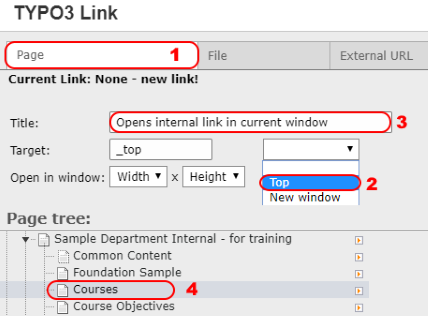
When you link to a page within the same workspace:
- Choose the Page tab.
- Choose Top in the dropdown menu.
- Enter Opens internal link in current window in the Title field.
- Browse the page tree to reach the page you wish to link to and click on the page name. (as pictured in figure 26-a)
Linking to an external URL (another website)
You can also link to other websites. Be judicious in how many external links you use as websites often change which could lead to broken links on your page!
Once you are editing within a content element, select the text that you want to link your file to and click on the TYPO3 Link icon (as pictured in Figure 23).
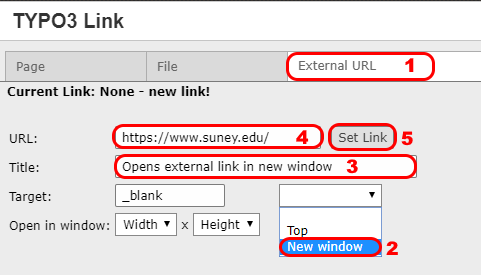
- Click on the External URL tab.
- Click the down arrow to open the target menu and choose New window. This will open the Web page in a new browser window or tab when a user clicks on the link in the Web page.
- Type Opens external link in new window in the Title field.
- Copy the URL and paste it into the URL field including the http:// or https://.
- Click Set Link.
(as pictured in Figure 27)
Save and switch to preview mode (see Previewing Pages) to test the link.
Linking to an email
You can also create links to email addresses on your page. If you provide an email address on your department’s pages, you should create a link to that email address.
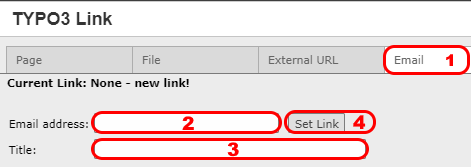
Once you are editing within a content element, select the text that you want to link your file to and click on the TYPO3 Link icon (as pictured in Figure 23).
- Select the Email tab.
- Copy and paste the full email address into the window.
- Type Opens window for sending email in the Title field.
- Click Set Link. (as pictured in Figure 28)
Save and switch to preview mode (see Previewing Pages) to test the link.
Accessibility Note: Accessible pages allow individuals using screen readers to ‘scan’ the links quickly by using meaningful text that describes the link destination. Never use phrases like ‘click here’ since, without the context of the paragraph, they are ambiguous. Use link words and phrases that can be intuitively organized, for example: ‘Contact us’ as opposed to ‘how to contact us.’
Tip: If the title on the hyperlink’s destination page gives an accurate summary of what is on the page, use it for the hyperlink text. For example, this hyperlink text matches the title on the destination page: Templates and Themes for Office Online.
Important: If multiple similar links on the same page go to different locations, do not use the same link text. Refer to the section regarding descriptive hyperlink text for additional information.
Link Titles: In TYPO3, use phrases placed in the title field to alert a user of assistive technology of actions occurring with the link:
-
Opens internal link in current window (when linking to another page in your workspace)
-
Opens internal link in new window (when linking to a page in another workspace)
-
Opens external link in new window
-
Opens PDF in new window
-
Opens window for sending email
-
Directs viewer to a section on this page (when linking to a bookmark on the same page)
-
Opens video in new window
-
Opens audio player in new window
- Plays embedded video on this page (for videos embedded using iframes)
Deleting Documents/Files/Images from your Filelist
TYPO3 editors have the ability to delete unused document and image files from their workspaces. TYPO3 should have currently used documents and images and should not be used to archive older files.
To delete unused or unwanted document or image files.
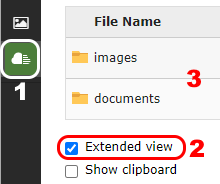
- Go to the Filelist Module.
- Check the box before Extended View (if not already selected).
- Select the appropriate directory- documents or images (as pictured in Figure 29).
Remember that the Ref number shows how many times a file or image is linked to within TYPO3 (as pictured in Figure 30).
- If the file has no references (“-“), the file is not linked in TYPO3 but might be used by other systems, such as Recruit. Once you have confirmed that it is not being used by an MCC system outside of TYPO3, skip to “Save and Delete the File.”
- If the file has a number in the Ref column, it is linked (or referenced) in TYPO3.

Remove References
- In the row of the file you’d like to remove, click on the i (info icon) or the number in the Ref column (Figure 31).

Figure 31 - In the resulting pop-up window, scroll down to see the list of TYPO3 elements that refer to the file (Figure 32).

Figure 32
- Click on the pencil icon to the right of each element.
- Remove or replace the file you want to delete from the element.
- To remove a hyperlink, place the cursor on the hyperlink. (The TYPO3 Link icon will darken.) Click on the TYPO3 Link icon (Figure 33). In the TYPO3 Link pop-up window, click the “Remove Link” tab on the right (Figure 34). Save and close the element. Repeat as needed.

Figure 33 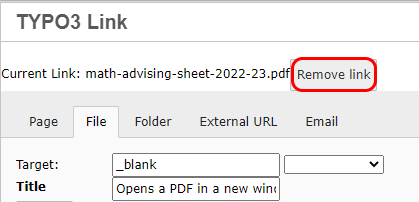
Figure 34 - To remove an image, select the “Images” tab. Hover over the file name for the edit options to appear. Click on the garbage can icon to “Delete record (!)” (Figure 35). Save and close the element. Repeat as needed.
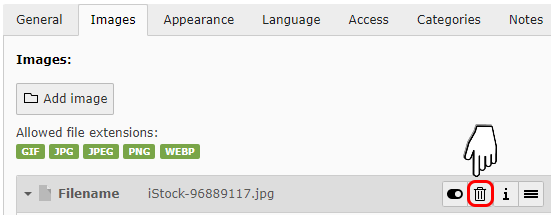
Figure 35 - Close the pop-up window.
- To remove a hyperlink, place the cursor on the hyperlink. (The TYPO3 Link icon will darken.) Click on the TYPO3 Link icon (Figure 33). In the TYPO3 Link pop-up window, click the “Remove Link” tab on the right (Figure 34). Save and close the element. Repeat as needed.
Save and Delete the File
Once you have removed all references to the file, please download and save the file, then delete it from TYPO3.
Save a Copy
If you would like to save a copy for archival purposes, click on the file name. The file will open in a new tab.
Exception: If the file is not an image or PDF, the browser will download it. Move the file from your Downloads folder to your Documents folder or shared drive.
If the file is a PDF, click on the Download icon (arrow pointing down at a horizontal line) (Figure 36). This will open a window to select the folder in which you can save the PDF.
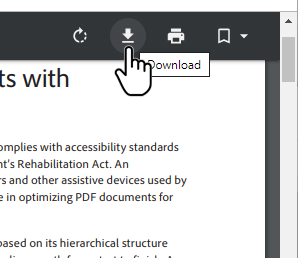
Figure 36
If the file is an image, click on the Show icon (Figure 37) to open the image in a new tab.
![]()
Figure 37
Right-click on the image in the new tab and choose Save image as… in the drop-down menu (Figure 37a).

Save the file to either your computer or on a shared drive, such as the M Drive.
Delete the File
Option 1 (Extended View):
- Click on the garbage can/Delete icon (Figure 38).
Option 2 (No garbage can icon):
- Click on the icon to the left of the file, such as the PDF icon or TYPO3’s image icon and select “Delete” from the menu (Figure 39).
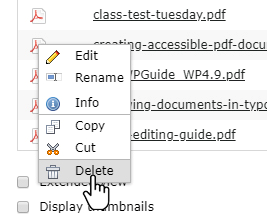
Figure 39 - It will ask if you are sure you want to delete the selected file. Click OK (Figure 40).

Figure 40 - Text in a green box will appear above the list of files confirming that the file has been deleted (Figure 41).
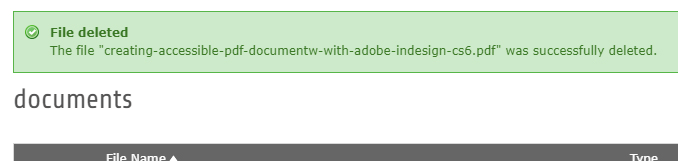
Figure 41
Format options in the editor
There are format options available from the menu bar in the editor. You should be sparing when using italics, bold and other type features. The Formats drop-down will be useful when editing to help replace Buttons and to add PDF and External link icons. The Styles page shows an overview of the current MCC web styles.
When you edit text that has special formatting (such as a Button), you may remove the formatting. No worries, you just need to select the text, and then apply the format after you are done editing.
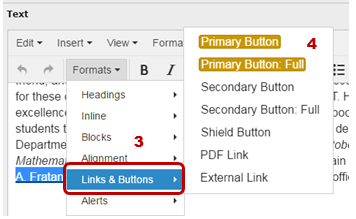
- To add a Links & Buttons format, you first need to create a link (see TYPO3 Link section).
- Select the text of the link.
- Select Links & Buttons from the Formats drop-down, (as pictured in Figure 42).
- Select your button style:
- Button Primary is outlined in Gold.
- Button Primary Full is a gold button (text will appear white).
- Button Secondary is outlined in Grey.
- Button Secondary Full is a grey button (text will appear white).
A general rule of thumb is to alternate use of primary and secondary buttons.
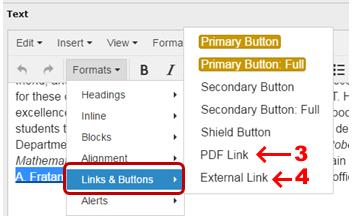
- Create a link.
- Select
- For document files (should be saved as .pdf), select PDF Link.
- For a link to another Website, select External Link.
(as pictured in Figure 43)
Previewing Pages
At any time during the editing process, you can preview the page to see what your changes will look like on the Web by clicking the Save and View Page option in the dropdown menu. This opens a new window/tab (as pictured in Figure 44). Be sure to allow all popups from this site!

Moving the (1) slider bar between Staged Version and Published Version moves the view between the page you are currently working on (Staged) and the page that is live on the Web (Published).
Clicking on the (2) end icon allows you to select how you want to compare the working and live view; either side by side (vertical), stacked on top of each other (horizontal), or by using the slider.
Move back to the other open TYPO3 tab to resume editing.

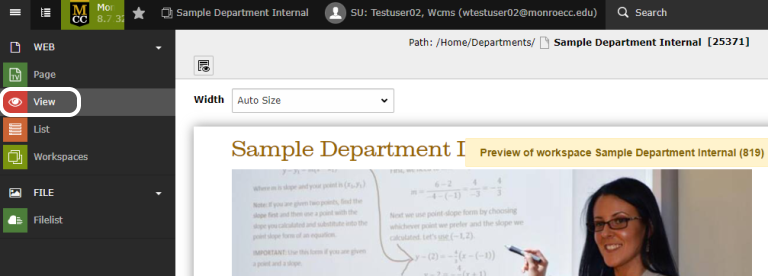
Another way to quickly preview your work; click View in the Web category of the Module Menu to open the page in the content area (as pictured in Figure 46). This preview does not give you the option to easily compare your changes to the live Web page.
Moving from Editing to the Next Stage in Workflow
Once you are satisfied that you are done, you need to move your edited page to the next stage in the workflow. Select the Save and View Page option in the dropdown menu to get the preview to open in a second window.
Move to the next stage by clicking ‘Send to stage “Dept Approval”’ at the top of the preview window, as pictured in Figure 47. Clicking on Discard will roll back any page content changes that are ready to send for publishing in the Workspace. Don’t worry if you click it by mistake, a pop-up will ask if you really want to do that.
NOTE: Using the green button in this view to send to the next stage in the workflow will mark all of the individual content elements on the page as “Dept Approval”.

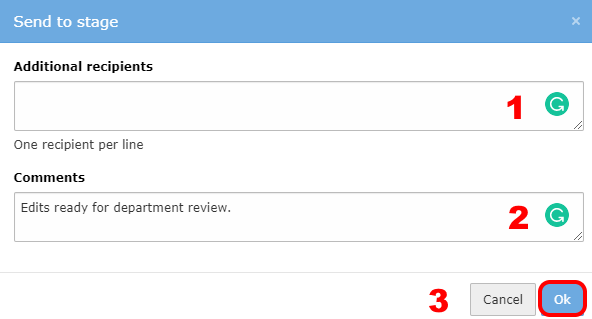
Once ‘Send to stage “Dept Approval”’ is clicked, a pop-up box will open. Some email recipients may already be listed and checked. Any that are greyed out can’t be changed or deleted.
- If no email recipient is listed and checked, make sure the notification is forwarded to your department publisher by typing their email addresses into the top text box (1). Additional recipients can be added to this form.
- Include a comment in the box below (2) to identify the change you made for your publisher.
- Click ok (3) to process the action.
(as pictured in Figure 48)
Reviewing Edited Pages and Publishing
The next eight steps require that you are a department Publisher. Basic Editors do not have permission to move changes beyond the “Dept Approval” stage.
In the working view of the site start at the landing/top page of the group, then open the Workspaces module in the left-hand navigation bar to view all changes to the site, and the current state for each change (as pictured in Figure 49).
- If you do not start at the landing page before opening the Workspaces module, you won’t see all of the changes.
- Click on the clear page cache icon
in the Page module, to make sure you can see all the changes when switching to the Workspaces module.
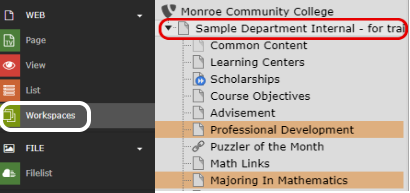
If you have access to multiple workspaces, you will see more than one tab, select the appropriate tab. Publishers will see all edited pages (as pictured in Figure 50).
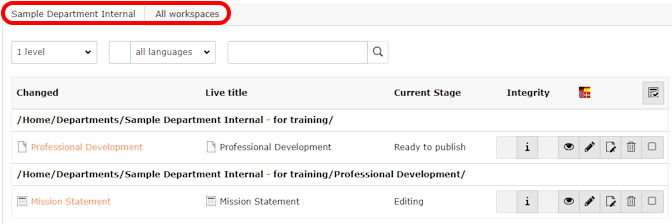
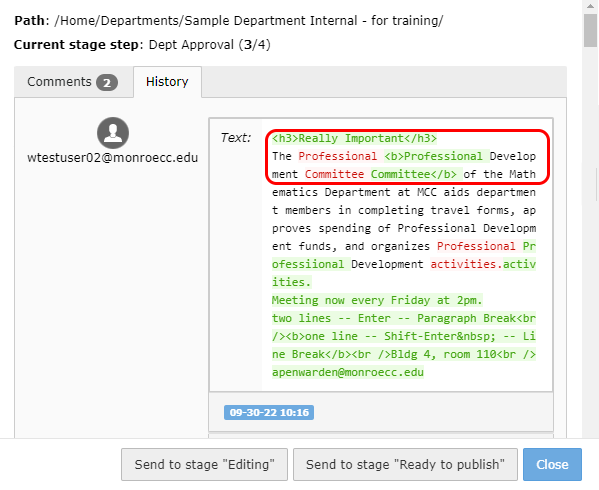
In the right-hand column, you can see the current stage, and choose action options related to the content element or page as detailed in Figure 51.
- Opens a pop-up that shows the color-coded changes made to the workspace element and the history of the changes, including the date and editor.
- Lets you preview the workspace element with changes.
- Opens the element for editing.
- Opens the workspace version of the page in editing mode.
- Discards the workspace version of the record.
- Selects the workspace element for staging action.
In the History tab, the green highlighted text indicates the change that was made to the page. You can also see the date and time the change was made, and who made it. (as pictured in Figure 52).
The legend at the bottom of the Workspaces module gives the color-coded key for the kinds of changes displayed in the record history. These include: edited, moved, created, hidden, and deleted (as pictured in Figure 53).

You can also choose the option to move forward or back in the workflow cycle until you have selected Send to Ready to Publish. Once an item is in Ready to Publish status (as pictured in Figure 54), it will get a final review by the Technology Services Web Team before it is published to the live website.* If at this point, you need to make a change, a web team member can return it to editing status for you.

Figure 54
Figure 54 above represents changes that were made to elements of the page titled Non-Traditional Ways to take Math Courses. Notice that the page title is color-coded edited, as pictured in Figure 53 above.

Figure 55 represents a new element that was added to the same page. Notice that the element title is color-coded new, as pictured in Figure 53 above.
After selecting all of the pages and elements, select the action from the dropdown menu at the bottom of the page (as pictured in Figure 56).

*Final Review
The College is committed to the accessibility of our website as part of our open-access mission and our service to our community. To further this commitment, the manner in which information is posted on the website has been changed to centralize the publishing of content, allowing trained members of the Technology Services Web Team to be the posters of new website material. While TYPO3 liaisons will retain responsibility for the content of their web pages and will still be expected to follow the ADA Compliance Standards and MCC Standards for which they have been trained, changes to the website will be published to the live website after careful review for ADA compliance, functionality and style conformity by the Technology Services Web Team.
Publishing Schedule
Publishing will occur Mondays, Wednesdays and Fridays, excluding days when the College is closed. Normal operations will commence on the next scheduled review date. Any changes made after noon are not guaranteed to be moved live until the next publishing day. Please plan your changes in accordance with the publishing schedule.
Urgent requests for uploads can be made on a limited basis. To request an urgent change, a technology request ticket must be submitted indicating the reason for the urgency and an explanation of what changes were made. Urgent requests for publishing will only take place during normal business hours and are not guaranteed. There will be a few exceptions for publishing changes that will be published to the live website outside of schedule:
- Broken Links
- Cancellations
- Date Changes
- Legal Requirements
- Misinformation
Full text of the ADA Compliance Publishing Schedule announcement (PDF).
Getting Help
Note: To print these instructions, right-click within the page and choose “Print” to open the print dialogue window.
The current version of other training materials can be found at M:\Offices\Shared\TYPO3 Training Materials.
Visual examples of pages, headlines, buttons, and more can be found on the TYPO3 Examples webpage.
To get help with TYPO3 technical problems or request an urgent change to a page, log on to MyMCC and go to the Tech tab. Under Technology Service Support & Requests, click Create or View Technology Support Requests. Under Request Help With… Select Web Site.
- In the Description, give a brief description of the TYPO3 issue.
- Be sure to include the URL of the page (copy it from the address bar of your browser).
- Add a date required if appropriate, complete the rest of the request as necessary and click submit.
Updates to the Faculty & Staff directory listings
Note: If you need to have the Faculty & Staff page updated, this information comes from the College Directory. Log on to MyMCC and go to the Tech tab. Under Technology Service Support & Requests, click Create or View Technology Support Requests. Under Request Help With … Select Telephone & Directory Services – then select Directory listings and fill in the form.